 The Fine-Cut Endo Handpiece
For filling and sealing with cement with an endo syringe there are fewer requirements than with most techniques.
For instance, there is no requirement that the canal be round, and thus there is no requirement that any rotating instruments be used in the process with their tendency to bind and break.
Since cement fills whatever voids there are in the preparation, there is also no requirement that the canal be evenly tapered or tapered at all for that matter.
Nor is there any absolute requirements (at least any dictated by the syringe method) that there be patency. If you feel that you want to leave the apex closed it only changes the preparation method slightly, namely that the needle tip be able to reach the very apical extent of the preparation. In other words that the bottom of the prep be at least 0.30mm in diameter to accept a 30 gauge needle which is 0.29mm.
All that is required is that the canal be clean
This gives the operator, that's you, a lot of freedom to choose your method of cleaning...and since circumferential filing is the fastest and best method of cleaning without instrument breakage and creating a smear layer, that's the method we have chosen.
The Fine-Cut Endo Handpiece is designed to do that in about 1/100th the time it takes to do that by hand.
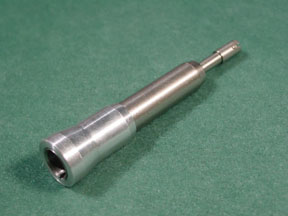
The Fine-Cut Endo Handpiece
The Fine-Cut Endo Handpiece, available exclusively from Special Products, in Santa Cruz, CA, attaches to any E-type motor you now have. But it operates most effectively when it is used at maximum rpm within its design limits of 25,000 rpm. It will, of course, work at lower speeds but not as effectively. In other words it will do the same job but not as fast.
Thus we recommend either the air moter or electric motor manufactured by MTI, the company that makes the Lynx handpieces. These handpieces have a maximum RPM of 22,000.
So let's start with the access cavity
The Access Cavity
I recommend opening with a round bur suitable for the tooth size. Most of the time that means a number 6. In smaller teeth a four.
The advantage of a round bur is that it is easier to feel when you break through the roof and is not as likely to perforate the floor of the pulp chamber.
Begin by 'de-roofing' the pulp chamber, boring straight into the tooth and then once having broken thru the 'roof' catching the overhang and lifting up until the opening reveals the entire pulpal floor with no overhangs. In other words an inlay prep not an amalgam prep.
Identify the orifices with a good stiff endo explorer, working it forcefully into the opening to form a 'v' shape opening. This makes it easier to get the tip of the file into the canal without snagging on any overhangs at the orofice.
The Traditional Method
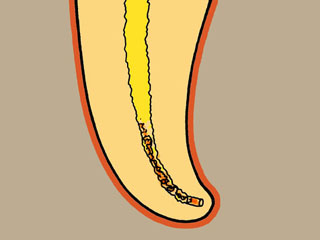
Traditionally the next step is to insert a small hand file into the canal as far as it will go, taking a radiograph and then proceding down to the apex by hand, measuring and THEN preparing the canal.

All this method succeeds in doing is taking microbes from the necrotic tissue in the pulp chamber and innoculating what MIGHT be a sterile apex...so we've modified this a bit....as a matter of fact, a lot.
Years ago, when Dr. Kit Weathers was teaching the "Automated Endo" course he suggested that it would be a good idea to open the orifice first before probing and measuring. And he was right but at that time, the only way to do that was by hand or by moving the Girofile in and out. The downside of this is that since you could only get a few millimeters of file into the orifice, it was common to pull the file completely out and then buckle the tip of this small file against the floor of the pulp chamber while reintroducing it. Most of the time this caused the buckled file to break....very embarrassing. So I discouraged it.
Loading Files into Fine-Cut Endo Handpiece
Now, however, the Fine-Cut-Endo-Handpiece does the up and down motion for you so all you have to do is introduce the tip, turn the handpiece on and steer it around the orifice. This makes it a sure fire and FAST method of orifice opening without using a rotary orifice opening bur.
Very frequently, as repairative dentin forms, it forms a shelf at the orifice, which a few seconds of filing will remove which opens the canal for larger instruments or for circumferential filing further down. And very often this means all the way to the apex.
Which brings up an important point. What size file to use?
File Sizes to Use
There is an important bit of information, obvious once you hear it, that theoretically you can enlarge any canal to any size with any file that will fit initially. Just stop when the canal is big enough. The limitiation on this used to be operator fatigue. It is just faster to cut with bigger files. But when a handpiece is doing the upping and downing for you, the number of strokes is immaterial.
I recommend either a size 20 or a size 25 or to play it really cautious, a size 30. The larger the file, the less likely it is that you will be able to get to and more importantly, through, the apex. Of course you can imagine, that the older the patient, the smaller the file it is safe to use. So arbitrarily I suggest that YOU start with a size 25.
Remember, all the while you are filing it is important that the dental assistant keep a small but steady supply of water flowing into the pulp chamber. It is NOT NECESSARY for the water to hit the file or for that matter, even be directed down into the canal. Each up stroke pulls debris up and the water capillaries into the canal below the tip of the file. On the down stroke the file flushes the water up out of the canal carrying more debris with it. Usually this only requires a flow rate of one drop a second.
In fact we have demonstated repeatedly that there is no debris left in the canal after circumferentiall filing with washed field. The fluid in the canal is circulated and is completely replaced EVERY TWO SECONDS.
No Patency Files Needed
Thus since the Fine-Cut files don't pack debris and washed field flushes constantly, there is no need for patency files as blockage of canals cannot occur. And since Fine-Cut filing cannot cause ledging because it only cuts on the way out, there is no need to use 'patency files' since patency is never lost.
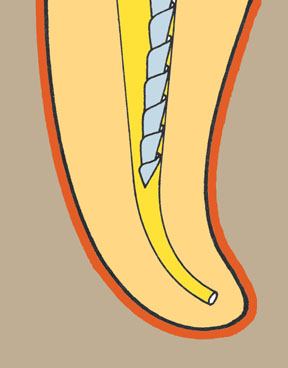
Spiraling Down Technique
The file should be inserted as far as you can without binding it. This dictates what we refer to as 'spiralling down' the canal. As the file is flared by the motion around the circumference of the opening the file can be inserted farther which in turn cuts the canal larger and allows the file to procede further.
Our goal in this initial crown down orifice opening/preparation technique is to stop about 3mm from the apex. So it is important to watch that you don't get over-enthused with the ease of this all and go too far. An estimate of the root length should be made so if the canal happens to be large, you won't go too far.
 So the limits are determined by:
These Are Not Ordinary Files
One thing you should be aware of, and you may be if you've read the rest of this lesson. Fine-Cut Files are designed to get stuck and not break. Since they are not rotating and the flute design is designed to resist breakage from pulling, if the file gets stuck just pull it out.
What to do WHEN the file gets stuck
DO NOT ATTEMPT TO UNSCREW THE FILE...JUST PULL IT OUT!!
Remove it from the handpiece if you HAVE to. Use a pair of ortho pliers or a needle holder forceps if you HAVE to, but do no unscrew it. Torque causes metal failure, stretching does not.
If you KNOW the canal is at least say 21mm and you've only gone five and the file repeatedly gets stuck, you may choose to use a smaller file.
There is another factor that you should know about before beginning.
When a file gets stuck because it is forced around a curve it is because the file flexes against the walls of the canal and bites in. These are positive rake files and slide in without biting and then cut on the way out. Since the file is going in and out, you can force the file around a curve and then it FEELS like it is pulling itself in. Once you get used to this you will notice it begin to pull a little without getting stuck and just KNOW that you ought to stop here.
Once you have gotten as far as you can go, the canal is clean down to that point. Now you can probe and measure to the apex, using whatever method you choose. Apex locators are fine for those who like them and feel comfortable using them. Radiographs are my method of choice because with a file in place at the apex, one can see any curves which might cause problems later.
The Preparation Shape
If you are going to fill using a syringe you need to be able to get the syringe to where you are going to begin filling. The smallest needle is 30 gauge, which is 0.29mm in diameter. This dictates a canal that is at least that big. This usually means a canal must be prepared with a size 35 file, which is 0.33mm at the tip. (a size 30 is 0.28).
Thus somewhere in the process a file that size must be passed to within 1mm of the apex.
Needle Sized Files
But there is an alternative. LightSpeed makes a size 32.5 rotary NiTi file which creates a cylindrical canal almost exactly 0.325mm in diameter. This of course exposes you to the risk of torsional fractures inherent in all rotating instruments.
Another more preferable choice is to use the Fine-Cut "infiNiTi" series of greater taper nickel titanium files which are designed to be used in probing mode. Since there is a size 35 by 02 taper, this can be used to form the needle seat.
After flaring the prep to the 3mm point and cleaning the apex to size, using just one LightSpeed to the one millimeter point, makes passage of the needle easy.
Note: You may wish to read the section on the 'parabola' and create a wider, pressure relief aread in the 3-4mm area of the prep. This assures that when the filling needle has been withdrawn to an area where the cross section is size 50 or greater there is no possibility of getting cement thru the apex. Normally a preparation is tapered such that this point is about 8-10mm from the apex.
What if You've Probed Short
But let's assume that the initial probing/crown down prep did NOT get to the 3mm point but stopped short of that, lets say 10 mm short of the apex.
Once you have passed a size 15 file to the apex, a size 20 file will fit to the 2.5mm point in the canal and thus will fit loosely to the 3mm point, we start our circumferential filing at the 3mm point with a size 20 and then repeat with size 25, 30 and perhaps 35 but rarely larger.
Thus at the outside limit it is possible to prepare any canal with as few as five file sizes and sometimes with only one.
For GP Users
If for some reason that I cannot understand you insist upon putting a gutta percha point in the canal, you will still have to taper the prep so it will fit. At this point you can do some crown-down rotary reaming with whatever rotay NiTi you choose. BUT the canal will already be clean and patent so your preparation time can be minimized as will the number of instruments you must use.
...but a better choice by far is to use the Fine-Cut "infiNiTi" series of greater taper files to form the gutta percha seat. These are used in probing mode only. Since they are more flexible than stainless Fine-Cut files they can negotiate curves using larger sizes. The idea is to use a size to fit the gutta percha point in a series of 02,04 and then 06 to the depth that you want your gp to seat.
Using the Multi_Mode Endo Syringe

There is a new syringe being developed now that incorporates needle and syringe barrel in a throw-away cartridge.
Here's a video of the loading process for that syringe.
At this point, open a new 30 gauge endo needle and try it into the preparation. If you have used the LightSpeed 32.5 to make a needle seat at the one millimeter point, the needle should drop into the canal to that depth.
If it does not, it almost always means that the canal is curved and the tip of the needle is gouging into dentin on the outside of the curve. The needle thus needs to be curved to match the curve of the canal.

To curve a needle it is important to understand that the VERY TIP of the needle is what is gouging in and IT needs to be curved. Using the closed beak of a hemostat or the round handle of an explorer, in the needle down on a hard surface such as a formica counter top and pull the needle out from under the instrument, much like curving a matrix band. If you press too hard it is possible to flatten the end of the needle and thus make it bigger, so don't press too hard.
There should be an audible click as the hemostat hits the counter top when the needle is pulled out.
Then try the needle in again. If you have curved it too much you may have to massage the needle to a more gentle curve.

Fine Tuning the Syringe
After deciding that you can get the needle to depth, attach it to the filled syringe and begin the calibration process, we call it 'fine-tuning' the syringe. Turn the plunger clockwise until cement flows, then counter-clockwise until it stops, bracketing in on the point at which the slightest turn starts the flow and the slightest turn stops the flow.
Practice until a stream of about 4-5mm flows out in the first second after turning and another 3-4mm the second second. This will give you maximum control of the flow.
Now insert the needle to the one millimeter point, give the syringe the amount of turn you just practiced and wait one second, pull back 1mm and wait another second then another wait another second. Notice that there is only one small turn (we call it a nudge) of the plunger up to this point.
If you have made a size 50 parabola at the 3mm point, you can now begin turning the plunger as fast as you can with no overfill danger. If not then give the plunger another nudge moving the needle tip back 1mm for each nudge and wait about five seconds at each subsequent stage until you are about 8-10 mm from the apex.

Now leave the needle in place and inject cement as rapidly as you wish. When the cement is seen crawling up the canal (we call this waiting for the white worm) flex the needle against the side wall of the canal and continue extruding as you withdraw filling the canal to the orifice.
Special Note about Post Preps
Special note: If you are planning a post, you can make your post prep before you fill and then simply fill to the bottom of the post hole as determined by depth or feel( you can feel the needle as it is withdrawn from the root canal prep and slips into the post prep.